What Tailoring Techniques Are Used in Muscle Shirt Sleeve Design to Enhance Upper-Arm Definition?
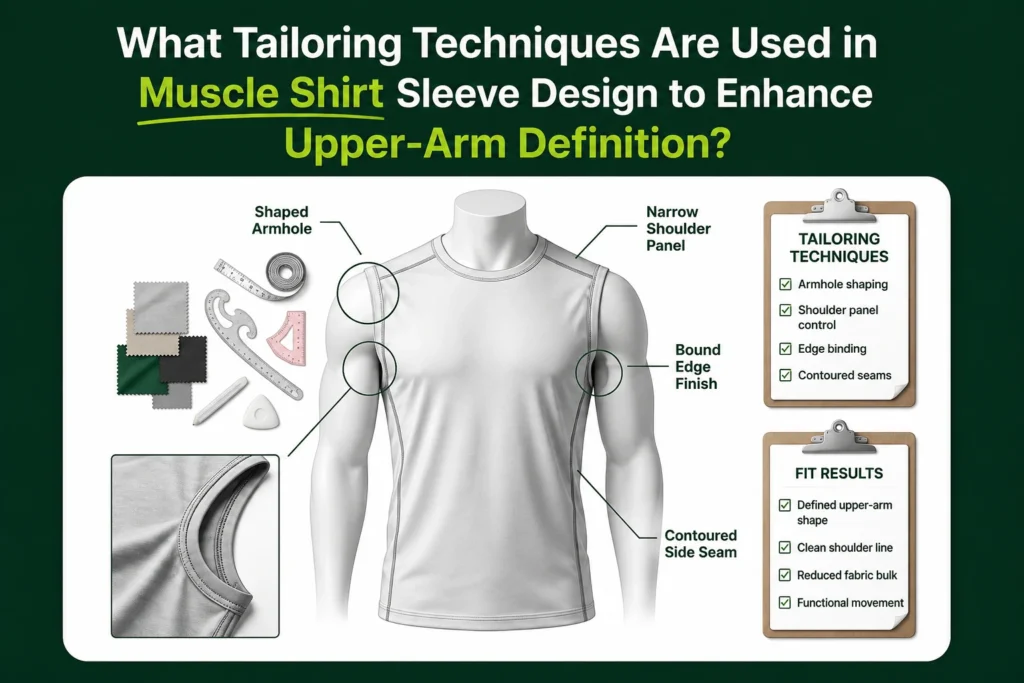
Muscle shirt sleeve definition is created through a controlled combination of high-set armholes, shortened sleeve coverage, tapered sleeve openings, stretch-supported fabric recovery, and seam placement that frames the upper arm instead of hiding it.
A muscular-looking silhouette is rarely created by simply sizing down a regular T-shirt. A standard shirt in a smaller size may become tight across the chest, pinch near the axilla, twist at the shoulder, or ride upward during movement. These problems create general tightness rather than clean upper-arm definition.
Muscle shirt sleeve engineering takes a more controlled approach. It manages the position of the armhole, the amount of upper-arm coverage, the circumference of the sleeve opening, the direction of the seams, and the way the fabric stretches and returns to shape.
This guide explains how muscle shirt sleeve engineering uses armhole height, sleeve length, taper, fabric stretch, and seam placement to improve upper-arm definition while preserving comfort and mobility.
Quick Fit Summary
The Cut: A higher scye can reduce loose fabric under the arm and help the sleeve sit closer to the torso.
The Length: Shorter sleeve coverage can expose more of the upper arm, but the best length depends on arm size, body proportions, wearer comfort, and setting.
The Fit: A tapered opening should contact the upper arm without pinching, rolling, or leaving strong pressure marks.
The Fabric: Elastane or spandex can improve stretch and recovery, but recovery also depends on the complete fiber blend, knit structure, fabric construction, and tested performance.
The Seam: Slightly forward or athletic seam placement can visually frame the shoulder area when the shirt’s shoulder width and sleeve alignment are correct.
Why Does Muscle Shirt Sleeve Engineering Matter for Aesthetics?
Muscle shirt sleeve engineering matters for aesthetics because sleeve shape controls how much of the shoulder and upper arm remains visible, how closely the fabric follows the arm, and how much loose cloth interrupts visual definition.
The shirt does not physically enlarge the arm or change the wearer’s body structure. It changes how the body is framed. A clean armhole, shorter sleeve coverage, controlled opening, and stable shoulder seam can make the transition from the torso to the upper arm appear sharper.
Loose or poorly positioned fabric weakens this effect. Excess cloth near the underarm creates folds and shadows. A wide sleeve opening hangs away from the arm and hides changes in upper-arm shape. A correctly balanced muscle-fit sleeve reduces these distractions without relying on uncomfortable compression.
Creating the Illusion of Shoulder Width
A higher and cleaner sleeve attachment can make the shoulder line appear wider because it reduces underarm sag and allows more of the upper shoulder area to remain visually exposed.
The visual effect comes from proportion and framing rather than physical enlargement. When the sleeve-body junction does not collapse into loose folds near the axilla, the visual starting point of the arm appears more distinct.
A stable sleeve attachment can also create a clearer separation between the torso and upper arm. This separation helps the shoulder area appear more defined, especially when the shirt body remains controlled rather than hanging loosely beneath the armhole.
This result still depends on the wearer’s proportions, shoulder width, fabric behavior, and complete shirt pattern. An armhole that is excessively high or narrow can replace clean framing with pinching and visible tension.
Eliminating Sleeve Flare
Sleeve flare weakens upper-arm definition because loose fabric hangs away from the arm, creates shadows, and hides the shape changes across the upper arm.
A muscle shirt sleeve should follow the upper arm closely enough to reduce empty space around the opening. The contact should remain controlled rather than compressive. The sleeve edge should not cut into the skin, roll upward, or leave repeated pressure marks.
A wide or nearly straight sleeve opening often produces a bell-shaped appearance. The fabric may appear acceptable while the arm is raised but flare outward when the arm hangs naturally. This usually signals that the sleeve opening, taper, or size does not suit the wearer’s upper-arm shape.
Readers comparing fit-driven silhouette with color-based styling can also review mint green shirts for business casual outfit context.
How Do Muscle Shirt Sleeves Compare to Standard T-Shirt Sleeves?
Muscle shirt sleeve engineering differs from standard T-shirt construction through higher armholes, shorter visual coverage, narrower sleeve openings, stronger taper, and fabric choices that support controlled stretch.
These differences should be judged through visible fit behavior rather than vague labels such as “athletic,” “slim,” or “body fit.” A shirt should not be considered a successful muscle-fit design simply because it feels tight.
A standard tee that is one size too small may become restrictive throughout the garment. A properly designed muscle-fit shirt can remain comfortable through the torso while using sleeve-specific shaping to frame the upper arm.
Performance Comparison Table: Muscle Fit vs. Standard Tee
| Feature | Muscle Shirt Sleeve | Standard Tee Sleeve | Functional Result | Failure Risk |
|---|---|---|---|---|
| Armhole Height | Higher and closer to the axilla | Lower and wider | Reduces loose underarm fabric and improves arm framing | Too high can pinch or reduce comfort |
| Sleeve Length | Shorter upper-arm coverage | Longer mid-arm coverage | Exposes more upper-arm contour | Too short can look overexposed or costume-like |
| Opening Width | Tapered and close to the arm | Straighter and looser | Reduces flare and supports visible definition | Too tight can roll, pinch, or leave pressure marks |
| Fabric Stretch | Often uses stretch fibers or recovery-oriented knit construction | May use standard cotton or a lower-stretch knit | Supports movement while helping the sleeve retain shape | Weak recovery can cause bagging after wear |
| Seam Placement | Athletic or slightly forward seam placement may be used | More neutral shoulder-seam placement | Can visually frame the shoulder and upper arm | Poor placement can distort the shoulder line |
No single feature creates successful muscle shirt sleeve engineering by itself. A narrow opening cannot correct a badly positioned armhole. Stretch fabric cannot correct a twisted shoulder seam. Short sleeve coverage cannot create clean definition when the opening flares away from the arm.
The complete sleeve system must balance exposure, contact, alignment, recovery, and movement.
What Are the Primary Tailoring Techniques Used for Muscle Shirt Sleeves?
The primary muscle shirt sleeve engineering techniques involve controlling the scye, narrowing the sleeve opening, shortening visible sleeve coverage, and shaping fabric tension around the upper arm.
Each construction variable creates both a possible benefit and a possible failure. A higher armhole may reduce loose fabric, but an excessively tight armhole can pinch. Shorter coverage may reveal more of the upper arm, but an extreme cut can weaken casual wearability.
The High-Set Armhole, or Scye
A high-set scye places the armhole closer to the axilla, reducing excess fabric under the arm and helping the shirt body remain more stable during movement.
The scye, also called the armscye, is the tailoring term for the curved armhole opening where the sleeve connects to the shirt body. The shape and size of this opening influence sleeve attachment, underarm fit, fabric pull, and movement. The armscye guide provides additional guidance on the term, armhole shape, sleeve joining, and fit behavior.
A higher scye can improve sleeve-body stability because less loose fabric sits beneath the arm. When the wearer raises an arm, less fabric may be pulled upward from the torso.
This does not mean the smallest possible armhole is best. If the scye is too high or narrow, it can pinch the underarm, create friction, pull across the chest, or become uncomfortable during overhead movement.
A practical test is to raise both arms slowly. The shirt may lift slightly, but it should not drag harshly across the chest or dig into the axilla.
The Tapered Sleeve Circumference
A tapered sleeve circumference narrows toward the sleeve opening, increasing controlled contact between the fabric and upper arm so that the sleeve follows the arm instead of flaring outward.
The taper should develop gradually from the upper sleeve toward the opening. Sudden narrowing can create an abrupt band around the arm, while insufficient taper leaves loose material beneath the shoulder.
A successful opening touches the upper arm without creating compression pain, strong pressure marks, or repeated rolling.
When the sleeve opening is too loose:
- The sleeve flares away from the arm.
- Empty space appears beneath the sleeve edge.
- Shadows hide changes in upper-arm shape.
- The shirt resembles a regular tee with shortened sleeves.
When the sleeve opening is too tight:
- The edge rolls upward.
- The sleeve pinches during flexion.
- Pressure marks remain after removal.
- Fabric pulls across the chest or underarm.
- Normal movement becomes uncomfortable.
A true taper shapes the sleeve while preserving usable movement. A sleeve that merely squeezes the arm is not well engineered.
Shortened Sleeve Coverage
Shortened sleeve coverage exposes more of the upper arm, allowing the arm contour to remain visible instead of being hidden beneath mid-arm fabric.
Many muscle-fit shirts use noticeably shorter coverage than standard tees, often ending above the mid-bicep rather than close to the elbow. This is a common design tendency rather than a universal measurement rule.
The ideal length depends on the wearer’s height, arm circumference, shoulder width, shirt size, intended use, and comfort preference. The same sleeve can appear moderate on one wearer and extremely short on another.
A sleeve that extends too far down the arm may hide the area the design is intended to frame. When combined with a wide opening, it may also produce visible flare.
A sleeve that is excessively short can resemble an exaggerated cap sleeve. This may suit gym-focused clothing but appear less natural in casual, social, or layered settings.
The best length exposes the upper arm without making the shirt appear accidentally undersized, uncomfortable, or costume-like.
How Do Seam Placements Enhance Upper-Arm Definition in Muscle Shirts?
Seam placement supports muscle shirt sleeve engineering by controlling where the fabric anchors, how the shoulder line is framed, and how the sleeve responds during normal arm movement.
The shoulder seam creates a visible boundary between the torso and sleeve. When it works with the shirt pattern and the wearer’s proportions, the sleeve can hang cleanly and maintain a stable direction.
When the seam sits too far forward, too far behind, or too far down the arm, the sleeve may twist or produce drag lines. These problems cannot always be corrected by choosing a smaller size.
Forward or Athletic Shoulder-Seam Placement
A slightly forward or athletic shoulder seam can frame the shoulder more clearly because the seam follows a common forward upper-body posture instead of sitting loosely behind the arm.
This placement may help the sleeve appear visually anchored when the wearer reaches forward or bends the arm. It may also prevent the seam from disappearing behind the visual shoulder line.
The amount of forward placement should not be treated as a universal tailoring measurement. The correct position depends on the pattern, shoulder slope, wearer posture, sleeve construction, fabric stretch, and intended fit.
A seam that sits too far forward can distort the shoulder line and make the shirt appear to rotate toward the chest. A seam that sits too far back may create drag lines, backward pulling, or visible sleeve misalignment.
The preferred position is the one that remains visually stable during standing, reaching, and normal arm rotation.
Underarm Gussets as an Optional Mobility Feature
Underarm gussets can be treated as an optional feature in muscle shirt sleeve engineering because they add shaped fabric near a high-tension area.
An underarm gusset is a shaped fabric insert positioned near the sleeve-body junction.
An underarm gusset may help manage pulling, bulk, or tension near the underarm, depending on the shirt pattern and fabric. Its practical value should be judged through actual garment movement rather than assuming that every gusset produces better performance.
The insert must integrate smoothly with the armhole and side seams. A poorly positioned gusset can create puckering, underarm bulk, uneven tension, or awkward fabric pooling.
A gusset is therefore an optional construction tool. Its presence alone does not prove that a shirt will provide better mobility or prevent seam damage.
How Does Fabric Choice Support Muscle Shirt Sleeve Engineering?
Fabric choice supports muscle shirt sleeve engineering because sleeve shape only works when the material can stretch, recover, drape, and hold controlled tension without bagging or clinging unevenly.
A carefully shaped sleeve can lose its intended appearance when the fabric stretches during wear and fails to return close to its original form. A poorly balanced material can also feel restrictive even when the pattern measurements appear suitable.
Sleeve behavior depends on the fiber blend, knit construction, fabric weight, stretch direction, and recovery performance.
Elastane or Spandex for Stretch and Recovery
Elastane or spandex can improve sleeve performance by allowing the fabric to stretch around the upper arm and return closer to its original shape after movement.
Performance shirts commonly use small percentages of elastane or spandex, but the ideal percentage depends on the garment purpose, knit structure, intended compression, and tested recovery.
Elastane percentage alone does not guarantee strong recovery. Textile stretch and recovery are performance properties that must be evaluated through the finished fabric and garment construction. stretch testing describes stretch and recovery as properties that can be assessed through textile performance testing.
A higher elastane percentage may increase stretch capacity, but recovery should be judged through wear testing, product specifications, and whether the sleeve bags out after repeated flexion.
A useful in-store test is to pull the sleeve fabric gently across its width and release it. Inspect whether the material returns close to its original shape. Then flex and relax the arm several times to see whether the opening becomes noticeably loose.
Too little stretch can make reaching and flexion uncomfortable. Too much stretch, excessive compression, or weak recovery can cause uneven clinging, sleeve distortion, or bagging after wear.
Fabric Weight and Drape
Fabric weight affects muscle shirt sleeve engineering because heavier fabrics can hold a cleaner shape, while lighter fabrics can sit closer to the body but may reveal wrinkles, transparency, or uneven tension.
Fabric weight describes how heavy or substantial a shirt fabric feels in wear.
Heavier materials can appear more structured around the sleeve edge. Lighter stretch materials can follow the upper-arm contour more directly.
Fabric weight alone does not prove sleeve quality, comfort, stretch, recovery, breathability, or durability. Two fabrics that feel similarly heavy may behave differently because of their fiber composition, knit density, finishing, and construction.
GSM may appear in a manufacturer’s product specification as a fabric-weight metric. An exact GSM figure should only be used when it has been verified from the product label, manufacturer specification, or another approved textile source.
Possible lightweight-fabric problems include:
- Transparency
- Excessive cling
- Visible wrinkles
- Uneven fabric tension
- Weak sleeve-edge structure
Possible heavyweight-fabric problems include:
- Heat buildup
- Stiffness
- Reduced breathability
- A bulky sleeve edge
- Restricted comfort when combined with a tight cut
The preferred fabric weight is the one that supports the intended sleeve shape, climate, activity level, and wearing context.
How Can Readers Diagnose Whether a Muscle Shirt Sleeve Fits Correctly?
Readers can diagnose muscle shirt sleeve engineering by testing sleeve contact, arm movement, sleeve length, shoulder alignment, and fabric recovery after repeated motion.
A mirror check while standing still is not enough. Raise the arms, reach forward, rotate the shoulders, flex the arms, and allow the fabric to relax before making a final decision.
Muscle Shirt Sleeve Fit Diagnostic
| Fit Test | Pass | Warning | Fail | Correction |
|---|---|---|---|---|
| Sleeve Opening Contact | Sleeve touches the upper arm without pinching | Sleeve rolls or leaves mild pressure marks | Sleeve digs into the skin or restricts comfort | Choose a larger sleeve opening, softer cuff construction, or higher-recovery fabric |
| Sleeve Flare | Sleeve follows the arm with minimal loose fabric | Slight flare appears when the arms hang naturally | Sleeve bells outward and hides arm definition | Choose a stronger taper or smaller sleeve opening |
| Arm Raise | Shirt body stays mostly stable during overhead movement | Shirt lifts slightly at the hem | Shirt rides up strongly or pulls across the chest | Choose a better-balanced scye, improved sleeve-body relationship, or stretch-supported fabric |
| Sleeve Length | Sleeve ends above mid-bicep without looking overexposed | Sleeve sits near mid-bicep or exposes slightly too much | Sleeve hides the upper arm or resembles an extreme cap sleeve | Adjust sleeve length for arm size and intended setting |
| Shoulder Seam | Seam aligns with or intentionally frames the shoulder | Seam drifts slightly forward or backward | Seam collapses, twists, or produces drag lines | Choose a better shoulder width or athletic-cut pattern |
| Fabric Recovery | Sleeve returns close to its original shape after flexing | Sleeve loosens slightly after wear | Sleeve bags out or loses contact with the arm | Choose better-recovery fabric or a more stable knit construction |
Use these tests together. A sleeve can pass visually but fail functionally if it pinches, rides upward, twists, or loses shape after movement.
Optional Fit Score
Assign a value to each result:
- Pass: 2 points
- Warning: 1 point
- Fail: 0 points
10–12 points: Strong muscle shirt sleeve fit.
7–9 points: Usable fit with minor issues.
4–6 points: Weak fit; adjust the size, fabric, or sleeve construction.
0–3 points: Poor fit; choose a different cut.
The score should support practical judgment rather than replace it. Severe pinching, uncomfortable pulling, or persistent seam twisting can justify rejecting the shirt even when the total score appears acceptable.
Key Tailoring Takeaways in Muscle Shirt Sleeve Design for Upper-Arm Definition
The key takeaway in muscle shirt sleeve engineering is that upper-arm definition comes from balancing exposure, sleeve taper, fabric recovery, shoulder framing, and movement comfort.
A shirt should not be selected only because it feels tight. The correct design controls where the material sits, how it contacts the arm, how the seams align, how the garment moves, and whether the sleeve returns to shape after wear.
The Tailored Fit Scorecard
Goal-Based Decision Matrix
| Goal | Choose | Avoid |
|---|---|---|
| Upper-Arm Emphasis | Shorter sleeve coverage with a tapered opening | Sleeves that extend too close to the elbow |
| V-Taper Illusion | Higher scye and clean shoulder framing | Low armholes that create underarm sag |
| Maximum Mobility | Balanced armhole shape, stretch-supported knit construction, or optional gusset details | Tight scyes combined with non-stretch fabric |
| Clean Casual Wearability | Moderate taper and controlled sleeve length | Extreme cap sleeves that appear too gym-specific |
| Shape Retention | Fabric with verified recovery and stable knit construction | Sleeves that bag out after flexing or washing |
Before buying, perform these checks in a natural standing position and during movement. Inspect the sleeve again after several arm flexions because some fabrics appear controlled initially but loosen after repeated tension.
A strong athletic-fit or muscle-fit shirt should pass both visual and functional evaluation. It should expose and frame the upper arm while remaining wearable for its intended activity or setting.
Final Muscle-Shirt Sleeve Fit Checklist
Technical FAQ: Muscle-Shirt Sleeve Engineering
High-set armholes do not automatically restrict overhead movement. A balanced high scye can reduce excess fabric pull and help the shirt body remain relatively stable. Restriction may occur when the armhole is too narrow, positioned too high for the wearer, poorly shaped, or combined with fabric that provides insufficient movement.
The best sleeve length usually ends high enough to reveal more upper-arm shape while remaining suitable for the intended setting. Exact length depends on arm size, shoulder width, shirt size, body proportions, fabric stretch, and personal comfort. No single inch measurement should be treated as a universal muscle-shirt standard.
A tapered sleeve narrows gradually while remaining comfortable around the shoulder and underarm. A sleeve that is simply too small may pinch the axilla, roll at the opening, pull across the chest, twist at the seam, or restrict normal reaching and arm movement.
Elastane can improve stretch and recovery, but it does not automatically create a better fit. Sleeve performance also depends on knit structure, fabric weight, pattern shape, seam placement, opening circumference, and recovery after repeated movement. A poorly cut stretch shirt can still pinch, twist, cling unevenly, or bag out.
Raglan-style sleeves are not automatically better for muscle shirts. They can create an athletic visual line in some designs, but the finished fit still depends on armhole shape, sleeve taper, fabric stretch, torso balance, shoulder proportions, and intended use. Construction quality matters more than the sleeve category alone. —
Terms Explained
| Term | Definition |
|---|---|
| Scye / Armscye | The curved armhole opening where the sleeve joins the shirt body. |
| High-Set Armhole | An armhole positioned closer to the underarm to reduce loose fabric and improve stability. |
| Sleeve Taper | A gradual reduction in sleeve circumference toward the opening. |
| Sleeve Flare | Loose fabric that hangs outward instead of following the upper arm. |
| Axilla | The underarm area where the arm joins the torso. |
| Forward Shoulder Seam | A shoulder seam placed slightly toward the front to follow posture or create athletic framing. |
| Underarm Gusset | A shaped fabric insert near the sleeve-body junction that may help manage tension or mobility. |
| Fabric Recovery | The ability of stretched fabric to return close to its original shape. |
| Elastane / Spandex | A stretch fibre that may improve flexibility and recovery in a suitable fabric construction. |
| GSM | Grams per square metre, a measurement of fabric weight rather than overall quality. |