How to Use the Deep Bend Diagnostic to Fix Shirt Tuck-Retention Problems
The Deep Bend Diagnostic is a controlled tuck-retention test that helps you measurably diagnose whether shirt untucking is caused by short shirt length, low trouser rise, weak tuck depth, loose anchoring, or a combined shirt-trouser system failure. Lower-back exposure during daily movement is frustrating, but randomly buying longer shirts without diagnosing the root cause often wastes money.
This guide explains why shirts untuck during deep bending, how to control the 90-degree hinge test, how to measure center-back tail escape, and how to confirm the correct fix with an A/B testing loop. The Deep Bend Diagnostic should be treated as a practical fit test, not a universal tailoring law, and measurements are signals requiring confirmation. The diagnostic focuses on real-world movement under controlled conditions, not showroom posture.
Download the Template Guide
Take the Deep Bend Diagnostic offline. Download our printable PDF template to track your wardrobe inventory and keep the modifier cheat sheet right in your closet.
Why Do Shirts Untuck During a Deep Bend?
Shirts untuck during a deep bend because forward hinging increases back-panel tension, pulling the center-back tail upward until it escapes the waistband if the shirt-trouser system lacks enough reserve length or anchor stability.
Why lower-back exposure happens during forward bending
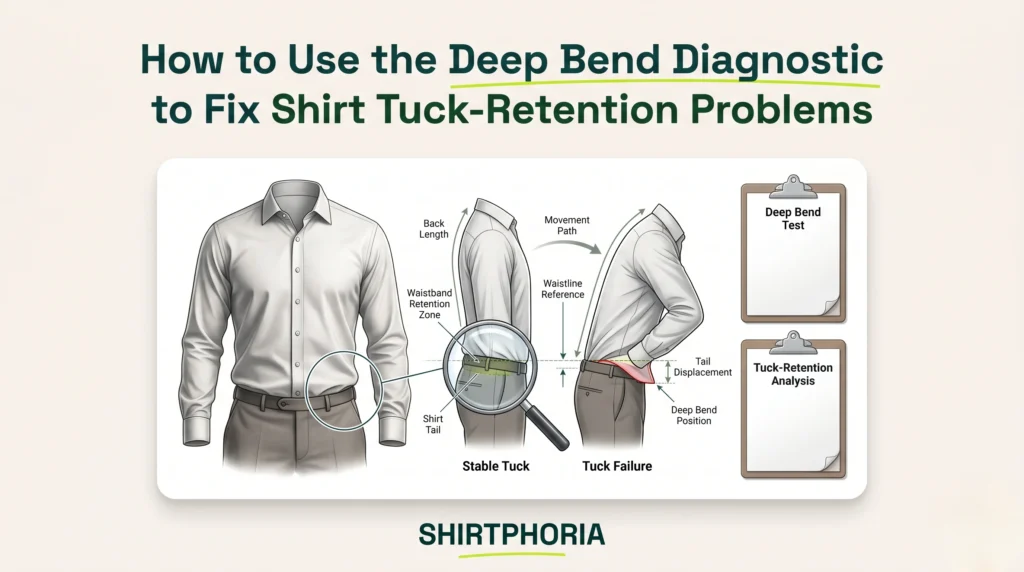
Lower-back exposure happens during forward bending because the motion increases the distance the shirt must cover along the back, forcing the center-back tail upward against the waistband. Forward bending increases back panel tension. If the shirt tail lacks enough reserve length below the waistband, upward travel causes the center-back tail to escape and expose the lower back. Lower-back exposure is a true failure signal, while minor billowing without skin exposure may be less severe.
How shirt length and trouser rise work as one tuck-retention system
Shirt length and trouser rise must be evaluated as one shirt tuck-retention system because a successful tuck requires both adequate shirt-tail reserve and a stable waistband anchor point. Shirt length and trouser rise form a tuck-retention system. The shirt must provide enough center-back length, while the trouser waistband must sit high and stable enough to hold the fabric during movement. Trouser rise is the distance from the crotch seam to the top of the waistband, which you can evaluate alongside your shirt measurements using the Shirtphoria Shirt Fit Tool. Mid-rise or high-rise trousers may provide stronger tuck retention in some setups because they can hold more shirt tail above the crotch line, but the result depends on waistband grip, fit, body shape, belt tension, and repeated testing.
Why buying a different shirt randomly may not solve untucking
Buying a longer shirt randomly may fail to solve untucking if the true point of failure is low trouser rise, shallow tuck depth, loose belt tension, or an unstable waistband anchor. Low trouser rise can undermine long shirt length. Even a longer shirt can still slip out if the trousers sit too low or the waistband does not hold the tucked fabric securely.
What Does the Deep Bend Diagnostic Measure?
The Deep Bend Diagnostic isolates and measures four practical variables: center-back shirt length, trouser-rise anchor strength, initial tuck depth, and belt-tension stability. The goal is not to measure every possible tailoring factor, but to isolate the most common tuck-retention variables.
The Four Variables
- ■ Center-Back Length: The fabric reserve.
- ■ Trouser Rise: The anchor point height.
- ■ Tuck Depth: The initial fabric below the belt.
- Belt Tension: The anchoring force.
How center-back shirt length affects tuck retention
Center-back length provides the fabric reserve required to keep the shirt tail below the waistband during forward movement. Center-back length refers to the vertical length from the back collar or neck area down to the shirt hem or tail. Using references like the Proper Cloth shirt length guide, you can see how more center-back length can support tuck retention by giving the shirt more fabric reserve below the waistband. Excessive length can bunch, fold, or feel uncomfortable depending on shirt cut and trouser fit.
How trouser rise creates the waistband anchor point
Trouser rise creates the waistband anchor point, and mid-rise or high-rise trousers may improve tuck retention in some setups because they can hold more shirt tail above the crotch line. Trouser rise is the distance from the crotch seam to the top of the waistband, effectively detailed in measurement guides like Land’s End. A higher waistband can capture more shirt tail and may reduce the amount of shirt length required to maintain a tuck. Body shape, waistband grip, trouser fit, belt tension, and fabric stiffness can alter anchor strength.
How tuck depth affects the diagnostic result
Tuck depth, defined as the amount of shirt fabric positioned below the waistband before testing begins, can create a false failure if the starting tuck is too shallow. Failing to pull the shirt fully down before securing the trousers can mimic the symptoms of a short shirt. The diagnostic is invalid if starting tuck depth changes between trials. Smooth and set the shirt consistently before every bend.
How belt tension and waistband stability affect shirt escape
Belt tension and waistband stability directly influence shirt escape because a loose waistband allows slippage while an artificially tight belt can hide everyday tuck-retention failure. The test must be conducted using normal daily belt tension. Over-tightening the belt creates false success. Loose waistband drift creates false failure. A firmer waistband grip can hold tucked fabric better, but the test must use normal daily tension.
How Do You Perform the 90-Degree Deep Bend Test?
To perform the 90-Degree Hinge Test accurately, you must establish a controlled setup, execute a forward hip hinge, measure center-back tail escape, and repeat the process before trusting the result. The phrase “90 degrees” means an approximate forward hinge target, not a medical range-of-motion standard.
Step 1: Set the shirt, trousers, belt, and tuck depth before testing
Establish the baseline by starting with the shirt fully tucked, smoothing the fabric evenly around the waist, and securing the trousers with normal everyday belt tension. Verify that the center-back tail begins completely below the waistband before initiating any movement. Use the same shirt, trousers, belt tension, and tuck depth for repeated trials. Changing setup conditions invalidates the comparison.
Step 2: Bend at 90 degrees without turning the test into a squat
Execute the test by standing straight, keeping the legs mostly extended, hinging forward at the waist to approximately 90 degrees, pausing briefly, and returning to a standing position. The movement must imitate a forward bend or hip hinge to pull the back panel, not a knee-dominant squat. Squatting changes the garment mechanics and tests a different movement pattern. Keep this motion simple enough to perform without special equipment.
Torso moves forward, hips move back. Pulls directly on the back panel.
Torso stays upright, knees bend. Fails to stretch the back panel.
Step 3: Measure center-back tail escape after the bend
Immediately after returning to a neutral standing position, measure the amount of center-back tail escape that has occurred above the waistband and record the result in inches or centimeters. Measure the vertical distance between the top edge of the trouser waistband and the lowest visible edge of the escaped center-back shirt hem. If the shirt remains securely below the waistband, record 0 escape. If the hem is visible above the waistband, record the visible escape distance. Use the same measuring method, posture, and tape alignment for every trial.
Step 4: Repeat the deep bend test before trusting the result
Repeat the deep bend test at least two to three times using the exact same setup, then use the average tail-escape measurement instead of relying on a single bend. Repeated trials improve diagnostic reliability. One bend can be distorted by slight postural deviations, unintentional belt shift, uneven tuck setup, or localized measuring errors. Treat repeated testing as practical reliability control, not unnecessary complexity.
| Date | Shirt ID | Center-Back Length | Trouser Rise | Belt Tension | Trial | Tail Escape | Notes |
|---|---|---|---|---|---|---|---|
| [Insert Date] | Shirt A | [Length Recorded] | [Rise Recorded] | Normal | Trial 1 | [Measurement] | Center back lifted. |
| [Insert Date] | Shirt A | [Length Recorded] | [Rise Recorded] | Normal | Trial 2 | [Measurement] | Similar result. |
| [Insert Date] | Shirt A | [Length Recorded] | [Rise Recorded] | Normal | Trial 3 | [Avg Recorded] | Use average for interpretation. |
How Do You Read the Deep Bend Diagnostic Results?
Reading the Deep Bend Diagnostic results requires interpreting tail escape within the context of the trouser rise, tuck depth, belt tension, and repeated-trial pattern used during the test. Focus on isolating specific failure points based on the combination of variables.
How to Identify Shirt-Length Failure From Tail Escape
Noticeable tail escape while wearing stable mid-rise or high-rise trousers is a strong signal that the shirt may not have enough center-back length. The trouser anchor must be stable before blaming the shirt length. This signal must be confirmed by re-testing a longer shirt with the exact same trousers, belt tension, and bend movement.
How to Identify Trouser-Rise Failure From Tail Escape
Significant tail escape while wearing low-rise trousers suggests a weak waistband anchor, meaning the issue may come from trouser rise rather than shirt length alone. Lower waist placement may reduce how much shirt tail is captured below the waistband. This signal must be confirmed by taking the exact same shirt and re-testing it with a mid-rise or high-rise trouser.
How to Identify Combined Tuck-Retention Failure From Tail Escape
Severe tail escape across multiple trouser rises suggests a combined tuck-retention failure involving both insufficient shirt-tail reserve and an unstable waistband anchor. Combined failure means both shirt-tail reserve and waistband anchoring contribute to the problem. The correct fix may require testing both a longer shirt and a more stable trouser rise. Combined failure should not be diagnosed until at least two controlled comparisons have been performed.
How to Separate Minor Tail Movement From True Untucking Failure
Minor fabric movement or billowing after a deep bend is not the same as a true untucking failure where the shirt hem escapes and exposes the lower back. If the shirt remains mostly tucked and true lower-back exposure does not occur, the setup may only require minor adjustments. Replacement garments should be reserved for repeated, measurable escape patterns.
How Do the Deep Bend Diagnostic Outcomes Compare?
The diagnosis-to-fix matrix compares tail-escape signals against trouser-rise context to provide actionable conclusions and identify the next required test.
These bands are starting diagnostic heuristics, not formal tailoring standards. They require threshold calibration over time as the tester gathers more results across different shirt cuts, trouser rises, belt setups, and body mechanics.
Diagnostic Threat Levels
| Tail Escape Signal | Trouser Rise Context | Likely Signal | Diagnostic Conclusion | Next Test |
|---|---|---|---|---|
| 0–0.5 in / minimal escape | Any rise | Green signal | System is likely stable | No major fix needed. |
| Around 1 in or more | Mid/high rise | Warning signal | Possible shirt-length failure | Test a longer shirt. |
| Around 1–2 in | Low rise | Warning signal | Possible trouser-anchor failure | Test same shirt with higher rise. |
| Around 2.5 in or more | Low/mid rise | Severe signal | Possible combined failure | Test both longer shirt and higher rise. |
| Mixed results | Any rise | Unclear signal | Setup may be inconsistent | Repeat test with tighter controls. |
Measurement Caution: These ranges are diagnostic heuristics, not absolute tailoring laws. Body shape, posture, shirt cut, fabric stiffness, waistband grip, trouser rise, and belt tension can alter the result.
How Do You Run an A/B Test for Shirt Tuck-Retention?
To validate the diagnostic result, you must run an A/B testing loop using isolation testing, which means changing only one variable at a time—either the shirt or the trousers—to confirm the most likely source of tuck-retention failure.
How to test trouser-rise failure with the same shirt
To test trouser-anchor failure, keep the same shirt, initial tuck depth, belt tension, and bending motion constant, changing only the trousers from low-rise to mid-rise or high-rise. If tail escape drops clearly when trouser rise increases, the result supports the conclusion that the original low-rise trouser weakened the tuck-retention system. The comparison should use repeated bends over a structured testing window.
How to test shirt-length failure with the same trousers
To test shirt-length failure, keep the same trousers, belt tension, tuck depth, and bending motion constant, changing only the shirt to a model with a longer center-back tail. If tail escape drops clearly with the longer shirt, the result supports the conclusion that the original shirt lacked enough center-back reserve for deep bending. Shirt cut, fabric stiffness, hem shape, and fabric behavior may also affect the outcome.
How to confirm combined tuck-retention failure
A combined tuck-retention failure is supported when the original shirt continues to untuck with higher-rise trousers and a longer shirt still produces measurable improvement. Combined failure means both shirt-tail reserve and waistband anchoring contribute to the problem. The correct fix may require changing both components systematically.
How to judge whether the A/B test worked
A successful A/B test is indicated when the selected intervention reduces center-back tail escape, prevents lower-back exposure, and keeps the shirt stable across repeated bends under normal daily conditions. Success must be judged by repeated stability, not by one good bend executed in perfect posture. The test supports the working diagnosis only if the variable change directly and consistently improves the measured failure pattern.
Advanced Performance Tracker
AppLog your A/B test results below. The engine will calculate diagnostic signals and map your progress to visually confirm your most stable setup.
A/B Testing Visualizer
Diagnostic Logbook
| # | Setup | Escape | Engine Diagnosis | Action |
|---|
The Tuck-Retention Diagnostic Checklist
The final takeaways from the Deep Bend Diagnostic are that shirt untucking is a measurable fit problem, shirt length and trouser rise operate as an interconnected system, and controlled A/B testing is required to identify the correct fix.
Turn the diagnostic result into a wardrobe rule
The Deep Bend Diagnostic should be used to create personalized wardrobe rules for the minimum shirt length, trouser rise, tuck depth, and belt stability required by your body mechanics. The final goal is a practical shopping and tailoring rule governing future purchases. The user can refine this rule over time by recording repeated results across different shirts and trousers.
Terms Explained
| TERM | DEFINITION |
|---|---|
| Deep Bend Diagnostic | A controlled tuck-retention test that helps you measurably diagnose whether shirt untucking is caused by short shirt length, low trouser rise, weak tuck depth, loose anchoring, or a combined system failure. |
| 90-Degree Hinge Test | A forward bending movement imitating a hip hinge to pull the back panel, reaching approximately 90 degrees, without turning into a knee-dominant squat. |
| Center-Back Length | The vertical length from the back collar or neck area down to the shirt hem or tail, providing the fabric reserve required to keep the shirt tucked. |
| Trouser Rise | The vertical distance from the crotch seam to the top of the waistband, creating the critical waistband anchor point that captures the shirt tail. |
| Tuck Depth | The specific amount of shirt fabric positioned safely below the waistband before the bend test begins. |
| Tail Escape | The measurable vertical distance between the top edge of the trouser waistband and the lowest visible edge of the escaped center-back shirt hem after the bend. |
| A/B Testing Loop | An isolation testing process involving changing only one variable at a time—either the shirt or the trousers—to systematically confirm the most likely source of tuck-retention failure. |
Conclusion
In conclusion, the Deep Bend Diagnostic transforms the vague annoyance of shirt untucking into a measurable, solvable fit problem by evaluating center-back tail escape against the waistband anchor point. Controlling the hinge movement, measuring center-back tail escape, and testing one variable at a time helps identify the root cause of the failure. The goal is not to force every shirt to behave perfectly, but to identify the shirt-and-trouser pairing that provides stable tuck-retention during real-world movement.
Diagnostic thresholds are practical signals, not universal tailoring laws. A stable tuck is not guessed into place; it is diagnosed by measuring how the shirt, trouser rise, tuck depth, and waistband anchor behave together under movement.
Medical & Technical Disclaimer
The Deep Bend Diagnostic and associated heuristics are practical engineering frameworks designed for garment fit optimization. They are not certified medical diagnostic tools. This guide is for informational and educational purposes only. Individual results may vary based on unique body mechanics, garment construction, and fabric properties. Always consult with a professional tailor for specific alteration requirements.
© 2026 Shirtphoria. All rights reserved.